Folding Instructions
"Crease Pattern I Folding Diagrams"
Format: A4 Template, PDF
Title: Crease Pattern, Folding Instructions
Requirements: Access to a computer or mobile phone with internet connection I A4 printer
Software: Adobe PDF Reader
Previous knowledge: Beginner- No previous knowledge required, Intermediate level- Previous knowledge required, Complex level- Advanced knowledge required
Language I Audio: German I Englisch
Additional materials: Cutting mat, cutter, scissors, embossing pencil
Time required: 15 min - 45 min
Content: Information, folding plans "Crease Pattern", folding instructions
Price: 0,00 Euro
Year: 2022
Crease pattern are like a composer's score or an architect's plans. Crease pattern and folding instructions must always be error-free, otherwise the folding of the object will not work. Reading Crease pattern and folding instructions requires some practice, similar to reading a score in music.
When creating the objects, follow some folding tips to achieve good results:
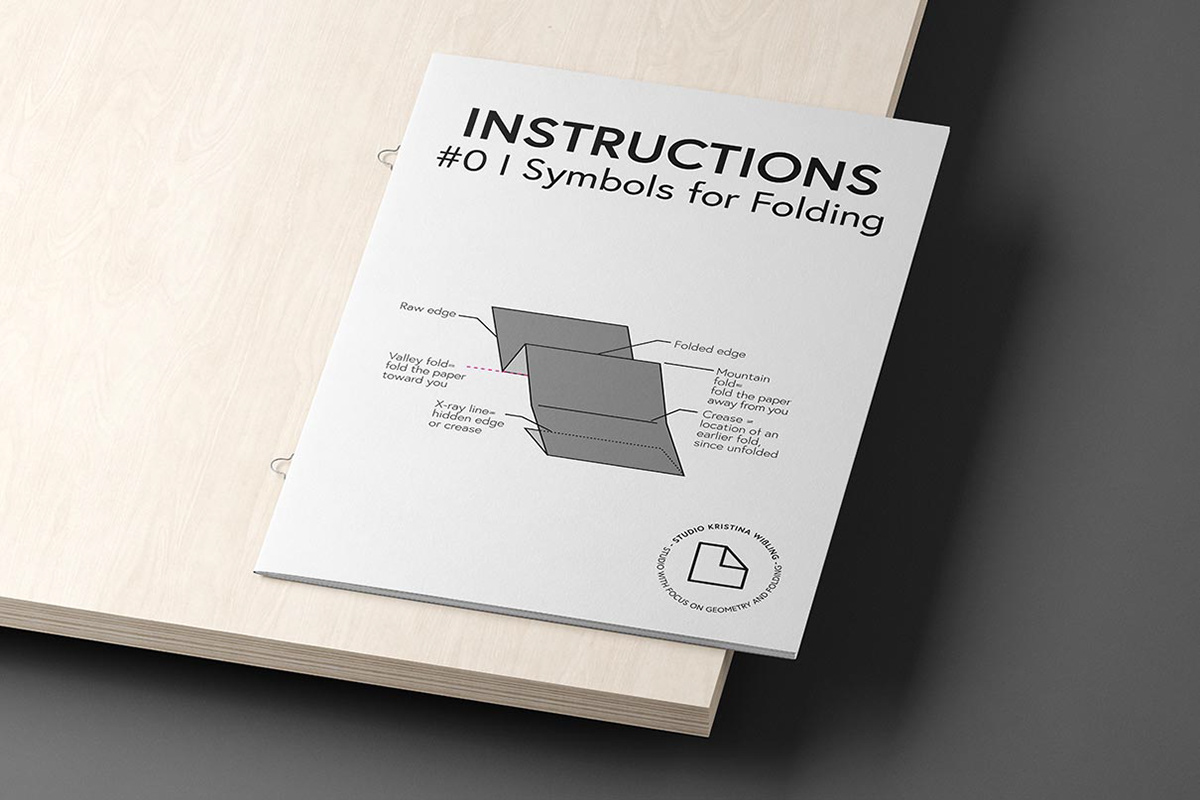
- The symbols and terms used in the templates, folding plans and folding diagrams are internationally recognised, once you know the symbols and different types of lines and arrows, you are virtually able to follow all the instructions and create folding objects.
- A sheet of paper has two sides. Therefore it can be folded in two directions. Each fold is a valley fold, a mountain fold or a combination of valley and mountain folds.
- Look carefully at each crease pattern or diagram. Which folds are mountain folds and which are valley folds? It is also helpful to look at the next folding steps to check the result.
- Fold accurately and precisely from the beginning. Incorrect folds made at the beginning will become more and more inaccurate during the creation of the object.
- Consider the thickness of the material/paper. Paper layers form very quickly, and especially with complex models they quickly reach a certain thickness. It is helpful to leave some space between two opposite edges so that the subsequent folds do not overlap.
- Be patient. Unclean or unfocused work at one stage of the model can tear the paper or make the result look messy. If a pattern proves too complicated during the folding process, try another model first and then return to the more complicated one. The first models rarely turn out to be masterpieces, however, with practice and repeated trials you can optimise results and almost certainly improve the quality of the folded objects.
Licence: For private and non-commercial use only.

BONUS INSTRUCTION
TITLE: "SYMBOLS FOR FOLDING"
CREASE PATTERN #1
TITLE: "YOSHIMURA PATTERN"


SYMBOLS AND LINE TYPES IN FOLDING DIAGRAMS
SYMBOLS FOR FOLDING
Learn about the symbolism and the different types of fold lines used in crease pattern and folding instructiuons. Symbols and line types familiar from origami books are used to indicate mountain and valley folds.
- FORMAT: A4 I PDF DOWNLOAD
- TITLE: SYMBOLS FOR FOLDING
- LANGUAGE: ENGLISH
- REQUIREMENTS: A4 PRINTER
- PREVIOUS KNOWLEDGE: NONE
CREASE PATTERN #1: YOSHIMURA PATTERN
CREATE YOUR FIRST FOLDING STRUCTURE
YOSHIMURA PATTERN is a classic folding structure for creating curves and arches. Among other things, it is used in the production of beverage cans. The folding gives the can stability and allows it to be produced with significantly thinner walls.
FORMAT: A4 I PDF DOWNLOAD
TITLE: YOSHIMURA PATTERN
ADDITIONAL MATERIALS: 1 SCISSOR OR CUTTER, CUTTING MAT, OPTIONAL (EMBOSSING PEN)
LEVEL OF DIFFICULTY: BEGINNER - NO PREVIOUS KNOWLEDGE REQUIRED
TIME NEEDED: 10 MINUTES
CREASE PATTERN #2
TITLE: "MIURA ORI PATTERN"
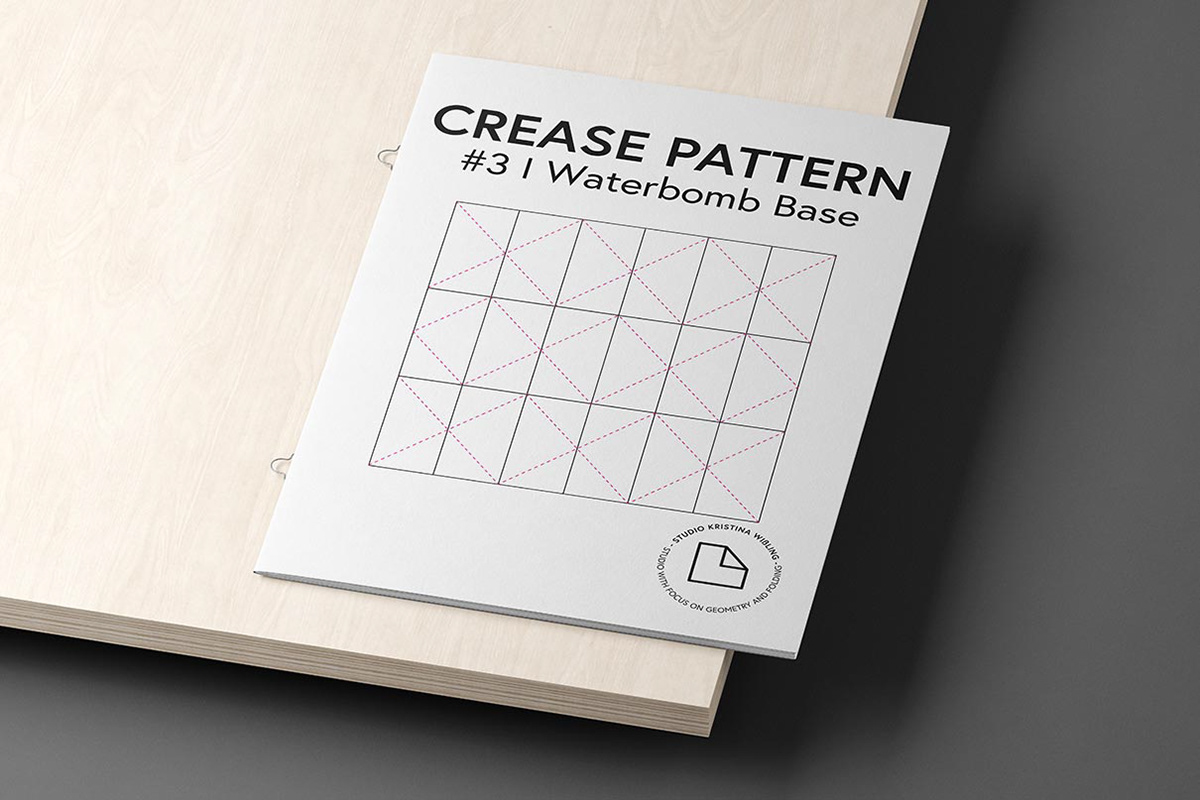
CREASE PATTERN #3
TITLE: "WATERBOMB PATTERN"

CREASE PATTERN #2: MIURA ORI PATTERN
CREATE YOUR FIRST "SPACE FOLD"
The MIURA ORI fold belongs to the so-called "Morphing Structures". It is flexible, and depending on the application, the folding can also create stabilities. The MIURA ORI fold is used, among other things, in folds for city maps and for solar sails in space.
FORMAT: A4 I PDF DOWNLOAD
TITLE: MIURA ORI FOLD
ADDITIONAL MATERIALS: 1 PAIR OF SCISSOR OR CUTTER, CUTTING MAT, OPTIONAL (EMBOSSING PEN)
LEVEL OF DIFFICULTY: INTERMEDIATE - PREVIOUS KNOWLEDGE REQUIRED
TIME NEEDED: 10 -15 MINUTES
CREASE PATTERN #3: WATERBOMB PATTERN
CREATE YOUR FIRST "WATERBOMB" FOLD
The waterbomb fold evolved from one of the basic folds in classic traditional origami. Today, the "Waterbomb Base" is used in minimally invasive surgery in the field of medical technology for implants (stents).
FORMAT: A4 I PDF DOWNLOAD
TITLE: WATERBOMB PATTERN
ADDITIONAL MATERIALS: 1 PAIR OF SCISSORS OR CUTTER, CUTTING MAT, OPTIONAL (EMBOSSING PEN)
LEVEL OF DIFFICULTY: INTERMEDIATE - PREVIOUS KNOWLEDGE REQUIRED
TIME NEEDED: 10- 15 MINUTES
CREASE PATTERN #4
TITLE: "HYPERBOLIC PARABOLOID"
CREASE PATTERN #5
TITLE: "RING TESSELLATION"


CREASE PATTERN #4: HYPERBOLIC PARABOLOID
CREATE YOUR FIRST SADDLE SHAPE
The HYPERBOLIC PARABOLOID is a saddle shape. The exciting thing about this folding structure is that it can be folded with straight lines. The crease pattern is square in structure, with accordion folds running parallel to each edge of the paper. Due to the folding developed by Eric Demaine, the surface takes the shape of a saddle (hyperbolic paraboloid).
FORMAT: A4 I PDF DOWNLOAD
TITLE: HYPERBOLIC PARABOLOID
ADDITIONAL MATERIALS: 1 PAIR OF SCISSORS OR CUTTER, CUTTING MAT, OPTIONAL (EMBOSSING PEN)
LEVEL OF DIFFICULTY: EASY LEVEL - NO PREVIOUS KNOWLEDGE REQUIRED
TIME NEEDED: 10-15 MINUTES
CREASE PATTERN #5: RING TESSELLATION
CREATE YOUR FIRST "RING TESSELLATION"
Computer-based crease pattern of a ring tessellation with a number of rings: 3, 17 axial divisions, and a rotation angle of 60 degrees.
FORMAT: A4 I PDF DOWNLOAD
TITLE: RING TESSELLATION 3I 17I 60
ADDITIONAL MATERIALS: 1 SCISSORS OR CUTTER, CUTTING MAT, EMBOSSING PEN
DIFFICULTY LEVEL: COMPLEX LEVEL - PREVIOUS KNOWLEDGE REQUIRED
TIME NEEDED: 20 MINUTES